VPC Flow Logs
AWS VPC Flow Logs capture information about the IP traffic going to and from network interfaces in a Virtual Private Cloud (VPC). These logs provide details such as source and destination IP addresses, ports, protocols, traffic direction, and the acceptance or rejection of the traffic. They are useful for network monitoring, troubleshooting connectivity issues, and auditing traffic for security analysis.
Ingest Methods
Setup the ingestion of this source using one of the following guides.
If using an AWS S3 bucket use the following SNS topic ARN to send your bucket notifications.
SNS topic & Custom SQS. Use the ARN above in your event notification tied to your S3 bucket—the topic name must match (runreveal_…; hyphens in the source id become underscores). For Custom SQS, set the queue URL and region in RunReveal; see AWS S3 Bucket with Custom SQS.
Note: BYOC, On-Prem, and BYODB customers must use their AWS account ID in the ARN instead of 253602268883.
Setup
Step 1: Create an S3 Bucket
- Sign in to the AWS Management Console and open the Amazon S3 console.
- Click on "Create bucket".
- Enter a unique name for your bucket (e.g., "my-vpc-flow-logs-bucket").
- Select the region where your VPC is located.
- Configure the bucket settings as needed (e.g., versioning, encryption).
- Click "Create bucket" to finish.
Step 2: Configure Bucket Policy
- In the S3 console, select the bucket you just created.
- Go to the "Permissions" tab.
- Under "Bucket policy", click "Edit".
- Paste the following policy, replacing
{your-bucket-name}with your actual bucket name:
- Click "Save changes".
Step 3: Create a Flow Log
- Open the Amazon VPC console.
- In the navigation pane, choose "Your VPCs".
- Select the VPC for which you want to create a flow log.
- Choose the "Flow logs" tab.
- Choose "Create flow log".
- Configure the flow log:
- For "Filter", choose "All" to capture all traffic.
- For "Maximum aggregation interval", choose your preferred interval.
- For "Destination", select "Send to an S3 bucket".
- For "S3 bucket ARN", enter the ARN of the bucket you created (format:
arn:aws:s3:::{your-bucket-name}). - Optionally, specify a "Log file format" if you want to customize the fields.
- For "Log record format", choose your preferred format (e.g., AWS default format).
- Choose "Create flow log".
Step 4: Verify Log Delivery
- Wait for some time to allow traffic to generate logs (this may take up to 15 minutes).
- Go to the S3 console and open your bucket.
- You should see folders created with the structure:
AWSLogs/{aws-account-id}/vpcflowlogs/{region}/{year}/{month}/{day}/ - Inside these folders, you'll find your VPC Flow Log files.
For more information, refer to the official AWS documentation on VPC Flow Logs.
Reducing Volume
VPC Flow Logs can be high volume, and some of those logs have little value. You can reduce ingest volume and cost by routing them to a dedicated pipeline and adding Drop steps to discard the low-value traffic.
In practice, teams can often drop 80–90% of flow logs with the steps below without losing meaningful security visibility.
Step 1: Create a topic targeting AWS VPC Flow Logs
Create a topic so only flow logs are routed to this pipeline, leaving every other source on its existing processing.
- Go to the Topics page and click Create Topic.
- Give it a name (e.g.
aws-vpc-flow-logs). - Add a precondition that exact matches the flow-logs source type:
- Field:
sourceType - Type:
exact - Value:
flow(this is the source type for AWS VPC Flow Logs)
- Field:
- For the pipeline, choose Create a new pipeline or Copy from an existing pipeline so you start from your standard
Transform → Enrich → Destinationflow.
Topics are evaluated top to bottom, and logs that match one topic do not pass through other topics' pipelines. Make sure this flow-logs topic includes a Destination step (e.g. RunReveal Backend) so the events that survive the drops still get stored.
Step 2: Add the drop steps to the pipeline
In the pipeline editor, add the two Drop steps below after your Transform and Enrich steps — so records are already normalized/enriched and the conditions evaluate against the normalized fields — and before the Destination step:
- Drop internal-to-internal traffic — discards east-west flows where both endpoints are in private (RFC 1918) space, typically the largest chunk of volume. Add one Drop step with two
cidrMatchpreconditions combined with AND:- Field:
normalized.src.ip· Type:cidrMatch· Value:172.16.0.0/12 - Field:
normalized.dst.ip· Type:cidrMatch· Value:172.16.0.0/12
- Field:
- Drop empty/no-event records — discards rows with no event (the
-placeholder), which carry no analytical value:- Field:
normalized.eventName· Type:exact· Value:-
- Field:
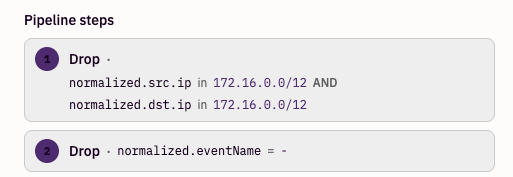
So the final pipeline order is: Transform → Enrich → Drop (internal-to-internal) → Drop (empty events) → Destination.
Adding two preconditions to a single Drop step creates an AND condition (both must match). To drop the other RFC 1918 ranges (10.0.0.0/8, 192.168.0.0/16), add a separate Drop step per range — multiple Drop steps act as an OR across the pipeline.
Dropping internal-to-internal traffic removes visibility into lateral movement and internal reconnaissance within those ranges. If east-west detection is a priority, narrow the drop to specific noisy subnets/hosts, or sample instead of dropping entirely.
Schema
The following columns are exposed for this source. RunReveal applies schema normalization across all sources, ensuring uniform field names and data types for cross-source queries and reusable detection logic.
Table: flow_logs (64 columns)
flow_logs (64 columns)| Column | Type |
|---|---|
workspaceID | String |
sourceID | String |
sourceType | LowCardinality(String) |
sourceTTL | UInt32 |
receivedAt | DateTime |
id | String |
eventTime | DateTime |
eventName | String |
eventID | String |
srcIP | String |
srcASCountryCode | String |
srcASNumber | UInt32 |
srcASOrganization | String |
srcCity | String |
srcConnectionType | String |
srcISP | String |
srcLatitude | Float64 |
srcLongitude | Float64 |
srcUserType | String |
dstIP | String |
dstASCountryCode | String |
dstASNumber | UInt32 |
dstASOrganization | String |
dstCity | String |
dstConnectionType | String |
dstISP | String |
dstLatitude | Float64 |
dstLongitude | Float64 |
dstUserType | String |
actor | Map(String, String) |
tags | Map(String, String) |
resources | Array(String) |
| Column | Type |
|---|---|
serviceName | String |
readOnly | Bool |
rawLog | String |
accountID | String |
action | String |
azID | String |
version | UInt64 |
bytes | UInt64 |
packets | UInt64 |
protocol | UInt64 |
tcpFlags | UInt64 |
dstAddr | String |
dstPort | UInt64 |
srcAddr | String |
srcPort | UInt64 |
endTime | String |
flowDirection | String |
instanceID | String |
interfaceID | String |
logStatus | String |
pktDstAWSService | String |
pktDstAddr | String |
pktSrcAWSService | String |
pktSrcAddr | String |
region | String |
startTime | String |
sublocationID | String |
sublocationType | String |
subnetID | String |
trafficPath | String |
trafficType | String |
vpcID | String |